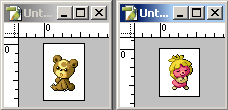
Spriting 101 - Lesson 1 - How to do basic splicesFor this lesson, I will show you how to do a splice using Photoshop. You can usually apply these same techniques to other 'nicer' graphic art software packages, although some of the tools may be different. First, open up the two different sprites you wish to blend together. For this example, we'll try blending elements of Smoochum with Teddiursa.
Both Pokemon are on white backgrounds, which will make cutting parts out more difficult. So we'll get rid of those first. Select your Magic Wand tool and be sure that Anti-aliasing is turned off (otherwise we won't be selecting individual pixels). Set your tolerance to something like 15. As you work, you can adjust it to suit your needs (higher tolerance = more similarly colored pixels will be selected). With the Magic Wand, click in the white space around Teddiursa to select the space around him. Press Backspace to clear the white pixels, leaving you with just the sprite. You may also need to delete the Background layer to see the sprite on the checkered transparent background. We'll do the same thing to Smoochum. Make sure you also delete any white pixels that may be inside the sprite (like between Teddi's paw and chin).
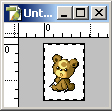
Now you should have two transparent sprites. It's time to decide what we'd like to splice. I'm going to add Smoochum's hair to Teddiursa. Note that two different sprites will often not match up perfectly, so you'll have to go back and fine-tune them. In order to get any kind of precision in spriting, you will need to zoom in with the Magnifying Glass tool to about 400% so you can easily see the individual pixels. Make sure that both your Eraser and Drawing tools are set to "Pencil" mode instead of brush, which will allow you to work pixel by pixel. Using the Lasso (free-form selection tool), draw a loop around Smoochum's hair. Make sure not to miss any pixels, although you can select extra. Once you select the hair, copy it to the clipboard (Ctrl + C). Then paste (Ctrl + V) onto the file containing Teddiursa. The hair will appear in a new layer.
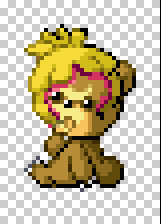
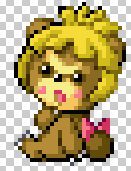
The hair looks backwards and sloppy, doesn't it? Select your Eraser tool (in Pencil mode), set the size to 1 pixel, and carefully erase all the pink dots from the hair to clean it up (since the hair is on a new layer, you won't accidentally erase any of Teddiursa's face when you erase). It might be easier to turn off Teddiursa's layer (clicking the "eye" next to the layer name) so you can see the Smoochum dots better. When you finish, go to Edit - Transform - Flip Horizontally to make the hair face the correct direction. When transforming sprites, you should only flip horizontally/vertically and rotate by 90 degree angles. Otherwise, you will lose your individual pixels and the sprite will become "fuzzy". The hair should look like the image below (I left the darkest pink for outlining purposes - I will change the color to a dark brown later).
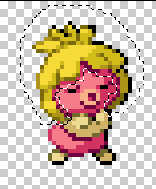
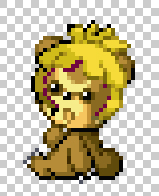
The hair still doesn't quite fit. This is where you'll need to do some scratch-spriting (making dots from scratch) and editing to make the hair fit. We'll also do the outlines in dark brown and add shadows to the face. Using extra layers can be very useful here for moving parts around until they fit just right. Using the technique of the Lasso tool, I cropped the sides of the hair and moved them outward to frame the face. I actually placed the left side of the hair behind the layer containing Teddiursa so it would be behind the face outlines. When shading on a multi-colored area (such as the moon design on the face), be sure to use the correct colors for shading - you can't make the whole thing brown.
Pay attention to the shading on parts you add from other sprites - you may have to alter the shading to make them fit with the original. Spriter's Challenge entries that have mismatched shading will lose points because the sprite won't look as nice. Remember - the light can only be coming from one direction.
When you're happy with the splice, you can go back and add more spliced parts or scratch-sprite extra details to make your sprite stand out. Add these on extra layers so you can easily delete them if they don't work. You can also fine-tune things like your shading at this point.
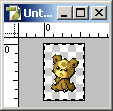
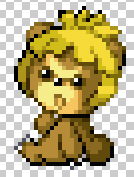
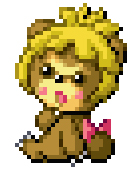
Your finished sprite would look like this:
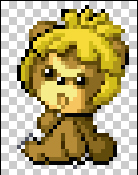
Say hello to Goldilocks, the Teddiursa/Smoochum combo! In this sprite, Teddiursa is the "base" because the accessories and other parts were added to that sprite. Keep this in mind when Spriter's Challenges specify a certain base must be used. Good luck spriters - I hope this lesson has introduced you to the wide world of splices, and that you will practice these techniques on your own. Don't have Photoshop? JASC's Paint Shop Pro is very similar, and provides a free 30-day trial before you buy the software (it's also cheaper than Photoshop). There are other software packages you can experiment with for similar drawing tools. Have a spriting/Photoshop question you'd like a lesson for?
Shoot me an email with the subject "Spriting 101" and I'll see
what I can do. BACK to Articles |