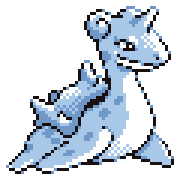
Spriting 101 - Lesson 3 - Decolors and Fake Screenshots!Welcome back, spriters! If you've been around the internet at all, you've doubtless heard lots of questionable Pokemon rumors (if you wish to read more, check out the Unconfirmed Misc. Strangeness section!) A lot of people claim you can catch G/S/C Pokemon in R/B/Y, although these Pokemon are not programmed into the coding at all. Other people claim "new" legendary Pokemon, sometimes called "Pokegods", appeared in their games. Well, they say a picture's worth a thousand words, so today I'm going to show you how to make your own doctored screenshots for entertainment value only. It's advised you don't try to pass these off as real, since most artists and Pokemon experts can spot your fake right away. But they certainly are fun to make, and they're good visual materials for fanfiction. The first thing you need is a "decolored" sprite that looks like it belongs in R/B. To do a decolor, you need to select a G/S/C or newer sprite and redo it only using R/B colors. R/B sprites have a max of four colors: black, white, and two shades of the same color (like two blues or two oranges). It's usually a good idea to use colors and shading styles from an existing R/B sprite for accuracy. G/S sprites are usually the easiest to decolor, but you'll need to add shading. Another nice thing about G/S sprites is that they're still a little awkward looking (as opposed to the more polished Ru/Sa/FR/LG sprites). Let's start with a gold Marrill. The G/S sprite has two different colors, but no shading, while the R/B sprite has two shades of the same color and it does have shading. Let's decolor using only the colors from a R/B Lapras.
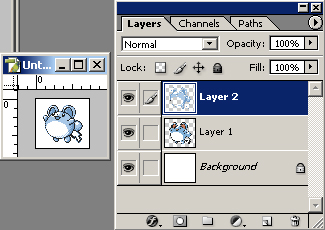
Notice how the shading style is done on Lapras (especially on the 300% zoom version below), and try to replicate it on Marrill. R/B used a lot of "every-other-dot" shading, and also used lighter colors in the outlines to blend better with the white screen. Take a look at R/B Pikachu's tail to see how the outlining tail dots should go. It's useful to work in layers for decoloring. When you're done, you should have a monochromatic Marrill.
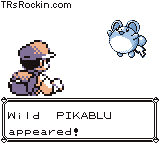
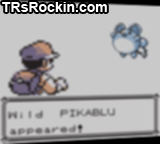
Next, you'll need to put your decolored sprite into a "Wild Pokemon Appeared" screen. I made this one from an 'M screen. You should hunt down the actual R/B font to make your Pokemon name - using Arial or Times looks horribly fake, and we're going for realism here. Be sure to line up the Pokemon's name with the bottom of the word "Wild" - I like to use Photoshop's guides for this.
When you're done, you should have something like this:
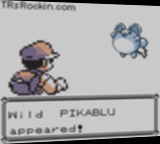
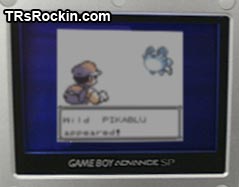
Your actual sprite editing is now finished. It looks pretty good, but it's obvious that this was made using sprites - it looks very... clean. Most questionable pictures you see online are very small and blurry, so we're going to duplicate that look using Photoshop's effects. The first step is to reduce the brightness and contrast.
Then, add a Blur More effect.
Next, make sure you have solid black as your background color and go to Edit - Transform - Skew. Pull the sides in as shown. This will make it look like you photographed the Game Boy at an angle (it's nearly impossible to make the screen completely square in photos).
Do another Blur More, then type your email address, nickname, or website at the top of the picture. You want credit for "finding" it, right?
You're about to add the ultimate in bad taste. Save the picture to your Desktop, then open it back up in MS Paint. Then save your image once again in Paint as a JPG. Zoom in and look at all those JPG Artifacts! When's the last time you saw a clean "questionable" picture, anyway? If that's not "dirty" enough for you, repeat this last step a few times. Each time you save, the picture quality gets worse.
Your picture is fine to post like this. If you want to go for that extra bit of "realism", try taking a picture of your own Game Boy, with the power on, playing a non-Advanced game. Paste your fake screenshot on top of where the lit square of the screen is, and use Skew to adjust the angles. Don't forget to add your site or email address to the screenshot - after all, it's yours!
Not bad, huh? It would doubtless fool some noobs into believing
it was real, and could probably start a lot of arguments, couldn't it?
Remember that you're not limited to just pixel-by-pixel drawing for your artistic spriting creations. Of course, you should never use techniques like this in a Spriter's Challenge or Contest, but they're neat to experiment with. Practice these techniques and you'll be making realistic screenshots in no time. Until next time, good luck and happy spriting! BACK to Articles |