Scaling props and accessoriesWhen you're making a cosplay, you want to look like a real-life version of the character. That means you need to scale the props and accessories to your body so they look right. Here's the method I use to get accurately sized costume pieces. Materials:
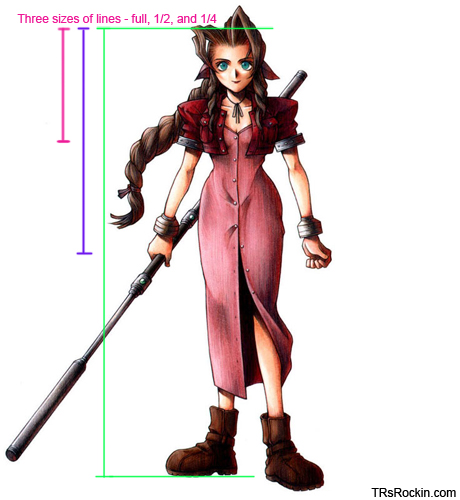
The first thing to do is disregard any information you know about the exact height of the character and/or props. Since you are going to be cosplaying this character (and thus "becoming" them), assume that the character is your exact height. This is the only way to get props scaled exactly to you. For this example, I am going to use a reference picture of Aeris from Final Fantasy 7 to determine the length of the staff she carries in proportion to my height, 5'6". This technique will work for large and small props as well as details on the costume. STEP 1: If you're using Photoshop, make this line on a layer separate from the reference artwork. You will need to move this independent of the picture. If you're using construction paper or thread, cut a length of your first color to this size.
STEP 2: In Photoshop, you can use the Free Transform tool on the first line you made. When you Free Transform, a crosshairs will appear at the exact center point of your line. Make sure you have Rulers displayed, and pull a guideline down from the top ruler to the midpoint of the line. On a separate layer, draw another line from this midpoint to the top of the first line.
If you're using string or paper, fold your original piece in half. Cut a second piece in a different color that's the same size as the folded original piece. You should now have two different measurements, one that's exactly half the size of the other.
STEP 3:
STEP 4:
STEP 5: Make a note of this on your Photoshop document or in your notebook. This is why we used different colors for each segment - it's easier to find "the green piece" rather than "the longest piece".
STEP 6:
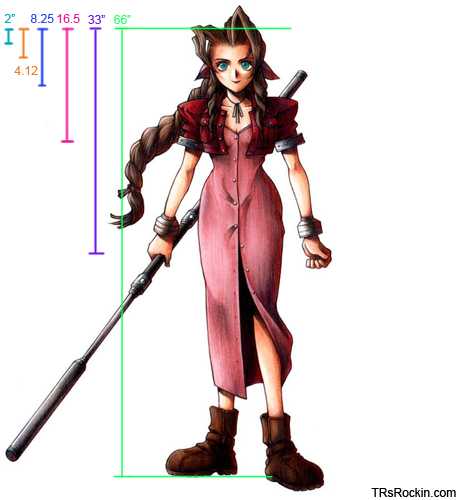
STEP 7: If you're using Photoshop, you'll need to use the Free Transform tool to move the pieces to the same angle as the staff in the reference picture. In the example, you can see that the staff is about the length of green + orange + aqua (maybe a little shorter than that). Substitute the actual measurements for the colors, and we get 66 + 4.12 + 2 = 72.12" (give or take). You can round that to an even 72", or 6 feet long, which means that staff will be 6" taller than your head (assuming you are 5'6").
Once you have the lengths figured out for a certain reference picture, you can use those lengths to find any measurement on the reference - the width of the bracelets, the height of the boots, even the space between buttons on the dress. You'll probably be using this most often for large-scale props - exactly figuring out every single detail's dimensions would be extremely time consuming! This is the same technique used for getting the dimensions on the Katamari costume heads and designs, as well as the size of certain accessories like the King's neck ruff and necklace. This was also how Link's Hylian Shield was sized. You can use this technique for any reference picture (even ones that aren't head-to-toe) as long as you have a specific measurement to work from. In the case of the King and Queen's heads, I used the width of the head tubes as my base measurement and determined the width and designs from there. You'll probably find lots of applications for this technique in your own costuming, as it tends to produce more accurate results than just eyeballing a piece to get its proportion to you. Best of luck, and happy costuming! BACK to Cosplay Guides |